


How It Works – Xiaomi Smart Home Devices Setup Guide (South Africa)
Getting started is easy – no tech degree required. Just grab a cup of coffee, a smartphone with your latest iOS/Android updates, and 20–40 minutes, depending on your device type. We’ll guide you through each step from unboxing → powering → pairing → testing. Curate Co products are chosen to make your life easier, not more complicated. This setup guide covers our most popular categories (Smart Wi‑Fi Cameras, Video Doorbells, Robot Vacuums, Smart Kitchen Gadgets) in simple steps. The flow is the same for all devices: Unbox → Charge/Plug → Connect to Wi‑Fi → Pair in App → Test.
Before you begin any setup, complete this pre-setup checklist to avoid interruptions:
-
Smartphone & Updates: Use a phone with the latest operating system (Android/iOS) and the Curate Co app installed.
-
Wi‑Fi Details: Have your Wi‑Fi name (SSID) and password ready. Note if your router broadcasts 2.4 GHz or 5 GHz (many smart devices require 2.4 GHz for better range).
-
Power Backup: In South Africa, load shedding is common, so consider a small UPS or power bank for critical devices (cameras, doorbells). Even a basic mini-UPS (~R600) can keep your Wi-Fi and router online during outages
-
Support Tools: Keep WhatsApp open on your phone – our local team responds fastest there. Have basic tools ready if you plan to mount anything (screwdriver, drill, tape measure, ladder).
-
Documentation: Keep the product manual and original box handy until setup is confirmed.
Pro Tip: Turn off any VPN or mobile data restrictions on your phone while pairing devices to avoid connectivity issues.
Unboxing – What to Expect
Every Curate Co product box includes:
-
The device (camera, doorbell, vacuum, kitchen gadget, etc.)
-
Power cable/adapter (for plug-in devices) or charging cable (for battery devices)
-
Mounting kit (brackets, screws, adhesives) if required
-
A Quick Start Guide (paper booklet)
-
Warranty & support info (often printed or on a card)
If any item is missing or looks damaged, contact us immediately via WhatsApp or email before you start setup. This ensures we can replace parts or swap the unit if needed.
Step 1 – Connect to Wi‑Fi & Power
Follow these general steps for almost all smart devices:
-
Power Up: Plug the device into an outlet or charge its battery fully. A steady power source is crucial for initial setup.
-
Match Networks: Connect your smartphone to the same Wi‑Fi network you want the device to use. Remember, many IoT devices only support 2.4 GHz networks, which offer better range through walls. If you’re on a 5 GHz network, switch your phone to 2.4 GHz or enable the router’s “smart setup” mode.
-
Open the App: Launch the device’s app (as named on the product page or manual). Grant any requested permissions (camera, microphone, location, notifications) to allow full functionality.
-
Add Device: In the app, select Add Device or a “+” sign. Typically you’ll scan a QR code on the device or enter a setup code printed on the device. Then input your Wi‑Fi SSID and password when prompted.
-
Troubleshoot: If the connection fails, restart the device (power cycle) and your phone’s Wi‑Fi, then retry. Ensuring the device has a visible blinking LED (pairing mode) can help.
These basic rules apply to all devices below. Now let’s look at category-specific steps.
Device-by-Device Quick Setups
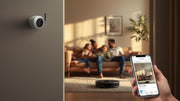
A) Smart Wi‑Fi Camera – Quick Setup (10–20 minutes)
-
Power/Charge: Plug in or charge the camera. Wait until any LED indicator shows it’s on and ready (often a steady or blinking light).
-
Install App: Download the specified app (see product card) and sign up or log in.
-
Add Camera: In the app, tap Add Device and choose your camera model. This starts the pairing flow.
-
Pairing Mode: Put the camera into pairing mode (usually by pressing a button until an LED blinks or you hear a voice prompt).
-
Scan or Enter Code: Scan the camera’s QR code or enter the code shown on its LCD (if applicable) into the app.
-
Wi‑Fi Details: Enter your 2.4 GHz Wi‑Fi network name and password in the app. The camera will connect – this may take a minute.
-
Name & Settings: Once connected, name the camera (e.g. “Living Room Cam”) and configure basic settings like motion detection sensitivity or alert zones in the app.
-
Test Live Feed: Before mounting, tap Live View on your app. Walk in front of the camera to trigger motion alerts or sound. Verify you see real-time video and get notifications.
Ensure the camera’s view is unobstructed and covers the desired area. Only after testing success should you permanently mount it.

B) Smart Video Doorbell – Setup & Mounting (20–40 minutes)
-
Power on Doorbell: Charge the doorbell or connect it to power. If you’re replacing a hard-wired doorbell, turn off the mains power first (to avoid any shock).
-
App Pairing: In the app, choose Add Device → Video Doorbell. The app will guide you through pairing (often scanning the doorbell’s QR code or syncing).
-
Temporary Mount: Use the included bracket and double-sided tape to temporarily attach the doorbell to the wall. This lets you test its angle and view.
-
Test Functions: Press the doorbell button and confirm it rings on your phone. Use the two-way talk feature on your app to speak to the doorbell, verifying audio works both ways. Adjust volume or talk time as needed.
-
Motion Settings: In the app’s doorbell settings, set up motion zones and sensitivity. For example, define the area of your front porch and increase sensitivity so the bell detects people, not passing cars or trees.
-
Final Mounting: Once satisfied, use the screws to permanently secure the mounting plate to the wall. Attach the doorbell unit onto the plate. For extra stability, make sure the bracket is level (use the app’s angle guide if available).
-
Wiring Note: If your video doorbell uses your old chime, double-check the existing wiring. If unsure about electrical work, hire a qualified local electrician.
Load-shedding Tip: For uninterrupted doorbell/camera alerts, use a small UPS or battery backup on the doorbell’s transformer. This keeps your doorbell online during short power cuts.

C) Robot Vacuum – Quick Setup (15–30 minutes)
-
Dock Placement: Put the charging dock against a wall on a flat surface. Leave about 1m of clearance on each side and clear the floor around it.
-
Charge First: Plug in the dock and place the robot vacuum on it. Let it charge fully (usually indicated by a solid light).
-
App Pairing: In the app, tap Add Device → Robot Vacuum and select your model. Follow prompts to connect the vacuum to Wi-Fi and give it a name (like “Ground Floor Cleaner”).
-
Initial Mapping: Run an initial cleanup or mapping cycle. Many vacuums create a map during the first run. You can start a short clean (5–10 minutes) to let it scan your space.
-
No-Go Zones: Once the map appears in the app, set up virtual no-go zones. Most robot vacuum apps let you draw zones on the map to block off areas (e.g. around pet bowls or fragile items). Some models also use magnetic boundary strips if needed.
-
Schedule Cleaning: In the app schedule, pick regular cleaning times (for example, daily at 10am). Let the vacuum run while you’re out.
-
Pre-Clean Checklist: Before each run, clear clutter: pick up loose rugs, cords, toys, or any obstacles that could tangle the brushes.
Maintain your vacuum: empty the dustbin after each use and clean brushes/filters weekly for best performance.

D) Smart Kitchen Gadget – Quick Setup
(e.g. Auto-Stirrer, Smart Scale, etc.)
-
Power/Charge: Plug in the gadget or fully charge it. Make sure any batteries are inserted correctly.
-
App Installation: Download the recommended app (or the specified universal IoT app) and create an account if needed.
-
Pair & Name: In the app, add the device and give it a clear name, like “Smart Scale – Kitchen” or “Auto-Stirrer – Cooking”. This helps you identify it easily.
-
Functional Test: Try a basic use-case. For a scale, place a bowl and check if weight appears in the app. For a stirrer, start stirring at low heat and ensure it spins correctly without spilling.
-
Store Extras: Put any accessories (measuring cups, extra hooks) in a known spot. Keep the cleaning/care instructions (often in the manual) handy in your kitchen.
Incorporate the gadget into your routine once confirmed working. For instance, use the smart scale for precise recipe measurements or the auto-stirrer while simmering soup.

Troubleshooting – Quick Fixes
-
Can’t connect to Wi‑Fi: Ensure your phone and device are on the same network band (2.4 GHz). If needed, move the device closer to the router. Restart the device and your phone’s Wi‑Fi, then retry the pairing.
-
App won’t find device: Enable Bluetooth (if required by your device). Try toggling Bluetooth/Wi‑Fi off and on, or restarting the app. Ensure the device is in pairing mode (blinking LED).
-
Motion alerts too sensitive: In the app’s device settings, reduce the sensitivity level or narrow the motion zones. This prevents false alerts from pets, trees, or passing cars.
-
Choppy two-way audio: Check your Wi‑Fi strength. For a doorbell, move the router or base station closer to improve signal. Also enable microphone permissions for the app on your phone (iOS/Android). Both steps help ensure clear talk.
-
Vacuum getting stuck: Remove small obstacles (toys, cords, thin rugs) and use boundary strips or virtual walls for problem areas. Adjust your furniture layout slightly if the vacuum struggles with a particular spot.
If an issue persists, record a short video of the problem and share it via WhatsApp support – it helps us diagnose faster than text.
Load-shedding & Power Advice (South Africa)
Power outages (“load-shedding”) are common in South Africa, so plan backups for your smart home:
-
Keep Router Powered: Use a mini-UPS or battery backup for your router and any fiber ONT. A small UPS (~18–100 Wh) can keep a home router online for hours. For example, many mini-UPS cost around R595 and offer 30–100+ Wh capacity.
-
Camera/Doorbell Backup: For critical security devices (camera/doorbell), consider a dedicated battery backup or UPS (even 1–2 hours of power). A typical Wi‑Fi router draws only 5–20W, so a 12V 7Ah UPS (~84 Wh) could power it for ~4–8 hours depending on load.
-
Fibre Connectivity: Many South African ISPs provide battery backup for their network equipment. Often the fiber ONT (network box) stays online during load-shedding. In fact, some ISPs even supply a free mini-UPS for your router/ONT. Check with your provider for details.
-
Critical Alerts: For peace of mind, set your app’s notifications to alert via mobile data if your home Wi‑Fi drops. This way you still get motion alerts on your phone even if the router loses power.
In summary, a small UPS or powerbank dedicated to your router and smart devices is a cost-effective way to ensure continuous monitoring during loadshedding
Maintenance & Updates
Regular upkeep keeps everything running smoothly:
-
Firmware Updates: After setup, check the app for any firmware updates for your device. Install them when convenient to get the latest features and security patches.
-
Physical Cleaning: Wipe camera lenses and sensor surfaces monthly with a soft, dry cloth to remove dust. Keep the doorbell lens clean of cobwebs or dirt.
-
Vacuum Care: Empty the robot vacuum’s dustbin after every run. Clean its brushes and filters weekly (or as recommended by the manufacturer) to maintain suction.
-
Secure Credentials: Use strong, unique passwords for your app accounts and Wi‑Fi. Consider a password manager to keep them safe. This prevents unauthorized access to your home devices.
Following these tips ensures reliable, long-lasting operation of your smart home gear.
Warranty & Returns
-
Local Warranty: We offer a 12-month local warranty on all Curate Co products (unless stated otherwise). This covers manufacturing defects under normal use.
-
Returns: Unused products in their original packaging can be returned within 30 days of delivery. (Please note, we do not offer return for change-of-mind after 30 days.)
-
PayFast Payments: Yes, we use PayFast for secure online payments. Refunds (if applicable) are processed via the same method, in accordance with our return policy.
Please ensure any return items are unworn, with all original accessories and manuals.
Need Help? Contact & Support
We’re local and ready to assist quickly via WhatsApp or email:
-
WhatsApp Support (fastest): Tap or copy this message into WhatsApp to start a chat:
“Hi Curate Co – I need help setting up [PRODUCT NAME]. My order # is [ORDER#]. [Brief issue description].”
Use this format to give us all the info we need up front. You can also share a photo or video of any problem through WhatsApp – it helps us troubleshoot faster. -
Email: customerservices@curatecollections.com
Include your order number, product name, and a detailed description of the issue (attach any screenshots or clips if relevant).
Our local team will respond as quickly as possible during business hours.
Frequently Asked Questions
Q: Will this setup work during load-shedding?
A: Most smart home devices need power to operate, so without backup they won’t stay online. We recommend using a UPS or battery backup for your router, camera, and doorbell to maintain connectivity during outages. See our Load-shedding & Power Advice above for tips.
Q: Do devices need the same Wi-Fi band as my phone?
A: Yes – during setup, your phone must be connected to the same network band (2.4 GHz) that the device will use. Most IoT products only support 2.4 GHz (which has better range). Make sure to switch your phone’s Wi-Fi to 2.4 GHz before pairing.
Q: Can I use PayFast for purchases and refunds?
A: Absolutely. We process all payments with PayFast. Refunds are issued through PayFast according to our returns policy.
Q: What are your warranty and return terms?
A: We provide a 12-month local warranty on all products. Unused items in original condition can be returned within a 30-day window for a refund or exchange, as per our policy.
With this complete guide, your Curate Co device will be set up and running smoothly in no time. Enjoy the convenience of your smart home, and remember – we’re just a WhatsApp away if you need assistance!

At Curate Co, we make smart living easy for South Africans. Just plug in, connect to Wi-Fi, and your home is ready...


